Travel Trailers can and do break down, this is just a fact. It may be something minor like a loose faucet connection, or something major like a broken suspension. Your tool box should contain the tools you need most frequently for repairs. Obviously, this is why pre-trip inspections are so important, as is regular maintenance. If you do those two things, you will save yourself some grief. You might also save yourself from being stranded on the side of the road.
Before I start talking about tools for your travel trailer, I have a word of caution. Please don’t purchase cheaply made tools. You will only frustrate yourself and probably ruin some nuts, bolts, screw heads, and generally make the repair take longer. Please buy decent tools – they don’t need to be super high end, but you must avoid the low end of the spectrum.
There is nothing worse than stripping the head of a screw, rounding a bolt, or maybe breaking a wrench. Wrenches that are made cheaply will probably not fit tightly and you will end up with bloody knuckles when they slip. My son in law Bob had some really cheap adjustable wrenches that I tried to use for some repairs around their house. Every time I turned the wrench on a nut it would instantly loosen. That experience gave me a great idea for a Christmas present for Bob that year.
Someone once said “If you’re going to buy your child a musical instrument, buy them the best one you can afford. If it is cheap, they will lose interest quickly because the quality and sound will be so bad”. Well, the same thing can be said about tools. A high quality tool will make the job go quicker, and with less effort. We have all heard the expression “The right tool for the right job”. A low quality tool, is not the “right tool”.
Now I know we talk about “Enjoying” your travel trailer, but things do break. If you are able to repair the trailer, you will get back to enjoying it quicker.
Now the following list is based on my experience. I like to do a lot of my own work. You may not feel that way. If you are not a “do it yourself” sort of person, your list could be much smaller. If you’re not comfortable at all with making repairs THERE IS NO SHAME IN TAKING IT TO AN RV REPAIR FACILITY.
So, that’s probably enough warning about tools. Let’s talk about the essentials:
Torque Wrench: A lot of folks don’t use torque wrenches, and that, in my opinion, is a bad idea. Torque specifications exist for a reason (like lug nut torque specifications). They ensure that you have the nut tight enough that it stays in place; but also prevents you from over-tightening and weakening the nut. You will probably be good with a wrench that can be adjusted from 10 Foot pounds to 150 FOOT pounds. I have a much larger torque wrench as well because my weight distribution hitch requires some massive torque on a few bolts. You may also want to purchase an INCH pound torque wrench for jobs that require torque settings that are much smaller. For instance, your air conditioner gasket bolts are torqued in inch pounds.
A Ratchet and Socket set: Depending on your preference you may choose a 1/2:” or 3/8” drive size. I would recommend carrying a variety of standard and metric sockets in your tool box.
A tire iron OR a socket that fits your wheel lug nuts. You will want a socket for your lug nuts because the socket will be used on your torque wrench. I check my lug nut torque before each trip. If it’s a high mileage trip, I will check the torque during the trip as well.
A good screw driver set: Should contain various sizes and both straight and Phillips heads.
A square tip #2 screwdriver. The square tip screwdriver is used in a number of places inside, and outside of your trailer. You will need it to remove multiple panels to access the water heater, furnace, converter, etc. These screws are even used inside cabinets. Take my advice and buy three – I’m always misplacing mine.
Pliers Set: This should include a channel lock, regular pliers, needle nose pliers, several different sized adjustable wrenches.
Wrench set: A set of box end/open end wrenches. After a while you will have a good idea of the wrenches you will use most often. I once left a large wrench at home that I needed for a hitch adjustment. That was a big mistake. Fortunately, my brother had one that I could borrow.
A hammer: This just generally comes in handy. Mainly I use mine for staking out the screen room, and the outside patio mat. However, don’t underestimate the need for it on larger jobs. Perhaps one day you will be unfortunate enough to need to change a leaf spring. You will need it then for sure. That being said, there isn’t much more use for a hammer on a travel trailer, click here to read more about that under #5 of the strangest things we have seen camping!
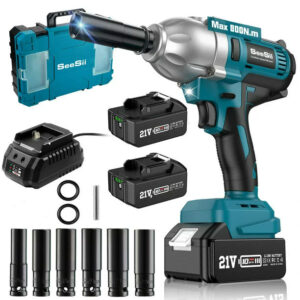
An electric impact driver: Or you could go the pneumatic route but you’ll need a compressor and a place to plug it in. There are nuts and bolts that will require this – trust me. It makes fast work of just about any task. Get a set of impact sockets to go with it. When you remove your tire in 30 seconds in 110-degree heat, you will thank me. However, don’t ever use an impact gun in place of a torque wrench when installing bolts etc.
An infrared Thermometer Gun: I actually carry this in the truck and at fuel stops I check the temperature of each wheel hub. If a hub is out of range with the others you may have a bad bearing or a dragging brake shoe. That kind of repair must take place immediately.
A Multimeter: You may or may not want to carry one of these depending on how handy you are and how comfortable/safe you are with electricity. These are good for trouble shooting electrical issues throughout the travel trailer.
Eternabond Tape: This tape will be used if you get a rip in your roof and need to patch it. You should carry a roll of it in your tool box because “sh$%” happens. Folks have actually taped up some pretty severe body damage as well just to protect the trailer until they could tow it to a repair facility.
A decent caulk gun: Please don’t buy a $2.00 caulk gun.
A tube of self-leveling roof sealant. Not all sealants are the same so pick one recommended by the manufacturer of your roof.
A tube of silicone: For sealing around windows, doors, lights, etc.
Assorted Wire nuts OR WAGO connectors.
Wire Cutter/Stripper.
Utility Knife
A decent flashlight.
A Bottle Jack: I carry a 6-ton bottle jack with me and enough blocks to put under it to lift the trailer. I also have a set of extensions from Safe Jack. These mount on my jack to add 8.5 to 12 inches of lift. Most trailer frames are very high, and that is where you will want to use your jack.
The following are not tools per see, but things you might want to consider having in your tool box.
A spare break-away cable
Any spare hitch parts you feel necessary (Hitch Pin, etc.)
A spare clearance marker/bulb
A spare turn signal/break light bulb
Fuses
Hose Washers: It’s always good to have these handy.
Zip Ties
Work Gloves/Rubber Gloves
A small level
Hose clamps: You can use these in a pinch of you have a leak in your plumbing.
A roll of plumbing tape.
A roll of Electrical Tape
Extra Leveling Blocks
I think the above list will serve you well. Another great way to build out your tool box is to look on-line for common issues with your make/model RV and see if there are any reoccurring repair themes. Then make sure you have the tools necessary should that happen to you.
In addition, it would not be a bad idea to carry a spare wheel bearing or two in your tool box. Make sure you carry some high temp grease for that bearing as well.
I have the Schwintek Slide system on my trailer and I carry a spare motor. I’m probably going to add a leaf spring to my tool box as well. For most folks that might be overkill but I don’t want to be shopping for parts on the side of the road.
One last piece of advice on doing repairs. Make sure you ask yourself the following questions:
Is this something I can do safely? Think this one through very carefully. If there is any doubt at all – DON’T GO ANY FURTHER.
Is this something that I can do without making matters worse? If I am unsuccessful with the repair, will I have made matters worse? In other words, don’t make a minor repair turn into something major. Sometimes a simple repair can be made into something almost un-fixable.
Have your tools organized, and keep them clean. Also, don’t store your electric tools in the RV basement when not in use. That’s just not a good environment for them. Temperatures in excess of 80 degrees Fahrenheit will degrade a battery. When temperatures go over 100 degrees this will cause rapid damage. For that reason, keep them somewhere cool.
As always when working on your rig, please be safe!
Share this post:


Leave a Reply